Getting Started
In the interest of keeping our repo maintainable, we haven’t committed several dependencies, such as the WordPress core, necessary plugins and several other developer dependencies.
Our frontend dependencies have been set up in the Bower config file, but once installed, some files will need moving to specific folder locations. Developer dependencies defined in our Gruntfile shouldn’t need any adjustments.
Setting up a new project
This setup is designed to work in a local development environment, which can then be moved to production.
Pulling the core framework files
Pull the Matter Kit repo from Github: https://github.com/MatterSolutions/matter-kit
Create a new project directory
Copy the Matter Kit files to a new project directory, within your local dev setup (WAMP, LAMP, MAMP etc). We use the following naming convention for our project directory names: client-wp-[client_code]
BrowserSync is set to look for that naming convention, so if you don’t wish to follow that, you will need to adjust the gruntfile configuration to suit.
In the base project directory, create a new folder called /htdocs/. Our project files will be deployed to this folder and are set up to work within the WordPress theme structure.
Configure Project Specific Details
Package.json
Change the project name, theme_name and the client_code to your specific project. The client code is what BrowserSync uses to build the synced URL.
.gitignore
We’ve already included many common files and directories that we’ve run into, however your project may call for something specific. Now is the time to add it!
Installing WordPress
Setup/install it to the /htdocs/ directory.
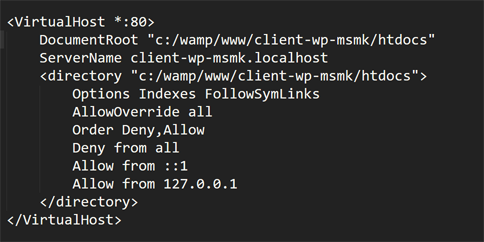
When configuring your virtualhost, ensure you set the DocumentRoot to /htdocs/. The /src/ directory is for our theme development files.

Install Plugins
We have several plugins that we require for use with the framework. Please note that many of these are premium plugins and have costs associated with them.
- Advanced Custom Fields Pro
This is a premium plugin. We use this throughout the entire framework for content design, so it’s absolutely necessary. - Matter UX Enhancements
Free plugin – we’ve included this in the framework src (/src/plugins/). Just move it to the plugins directory and activate it. - Gravity Forms
This is a premium plugin. This isn’t a required dependency, however we recommend using it. - Akismet
Premium plugin. This isn’t a required dependency, however we recommend using it. - Manual Image Crop
Free plugin. We use this to crop specific images across the different image sizes used throughout the theme. - Video User Manuals
Premium service. This plugin isn’t a required dependency, however we recommend using it. - Duplicate Post
Free plugin. We use this to duplicate content layouts that we’ve built using the ACF flexible content fields.
Creating a Custom Theme
With the setup out of the way, we can begin building the custom theme. All of our theme development happens in the /src/theme/ directory. If that directory doesn’t exist, create it now.
Setting up the core theme files
Copy the files and directories within the /src/base/ directory over to /src/theme/. These are the main core files that are used throughout every project. We’ve included several base template files in here. If you are aware of some templates that your project won’t need, delete these now.
Naming your theme
Open /src/theme/style.css and write your theme name, description and license information.
Install dependencies
In your terminal within the main project directory, run npm install. This will install our developer dependencies and copy our base files across to our theme folder within WordPress.
Front end dependencies
Install the front end dependencies with bower install in the main project directory. Some of these files will need to be copied to our /src/theme/assets/js/plugins/ folder.
- bower_components/magnific-popup/dist/jquery.magnific-popup.min.js
- bower_components/matchHeight/dist/jquery.matchHeight-min.js
- bower_components/svg-injector/dist/svg-injector.min.js
Copy the above files over to the /src/theme/assets/js/plugins/ folder. If you are aware that your project will need a slider, you can also copy the slick.js file.
Switch to your theme
Set your active theme to the theme we’ve just named.
Adding components
There are a number of optional components available. When you’ve decided which components you will need, copy each file into it’s relevant directory.
PHP partials
These need to go into the /src/theme/template-parts/ directory. You can categorise these into subdirectories or place them all in the template-parts directory. We’ve recommend breaking them into categories that make sense for your development team, so everyone will know where to find the partials.
SCSS partials
These need to go into the /src/assets/scss/modules/ directory. Ideally these should be categorised in the same way as the PHP partials to ensure consistency.
JS partials
These need to go into the /src/assets/js/partials/ directory.
Add SCSS imports
With our dependencies added and the components copied across, we need to include the sass files.
Open /src/theme/assets/scss/main.scss and begin adding the references to the scss files we’ve copied to our modules directory.

Grunt Build
In your terminal, run grunt build. This will force all the theme files to be copied across and ensure the JS files are set up. After this, you can run the grunt dev task in your terminal and begin building and styling the theme.
Customisation
Many of the styling changes to be made will need to be made in the /src/theme/assets/scss/base/ directory. There are several configuration files here that you can customise.
Once you’ve customised these options, go ahead and change anything within the scss files! Create new modules for styling, adjust the existing ones etc. Build custom components for the project, whatever is necessary for the project you’re working on.
